- Turbo
- Blog
Correct ESD heel straps instructions must cover more than fastening a band around a shoe. A heel grounder works only when its conductive contact reaches the wearer, the cup stays against the heel, the strap interfaces with an approved ESD floor, and the complete person-footwear-floor system passes the facility test. Fit, walking style, socks, contamination, damaged components, and an unsuitable floor can all interrupt the path. This guide gives operators and ESD coordinators a practical sequence for fitting, testing, daily use, troubleshooting, cleaning, inspection, and replacement without assuming that every heel strap or workplace uses the same resistance limits.
Understand what a heel strap can and cannot do
A heel grounder is a personnel-grounding device intended for use while a person is standing or walking on a compatible controlled floor. It does not make an ordinary floor conductive, protect a seated operator who lifts both feet, or replace a wrist strap where the written procedure requires one. The local ESD control plan decides the approved device and test limits.
The conductive ribbon or contact tab normally provides the connection from the wearer to the grounder. The outer cup and contact element then interface with the floor through the shoe. Because the complete path matters, approving a loose strap on a bench is not the same as verifying the worn system.

Fit the heel grounder in the correct sequence
Start with a clean, dry, approved shoe. Place the cup firmly around the heel so its contact surface can meet the floor through a normal walking step. Route the contact ribbon exactly as the manufacturer specifies, usually inside the shoe where it can contact the wearer. Do not fold, trim, knot, or place it over an insulating sock unless the approved design specifically permits that arrangement.
Fasten the strap snugly enough to stay in position but not so tightly that it creates discomfort or a safety problem. Loose hardware can rotate to the side, miss the floor, or catch on surrounding objects. Use one or two grounders according to the site rule; do not assume a single grounder is acceptable simply because one foot passed once.

Test before entry and respond to a failure
Use the facility-approved footwear tester and follow its posted sequence. Stand as instructed, place each foot on the proper plate, avoid leaning on grounded objects, and wait for a clear result. Record or acknowledge the test where required. Test limits and frequency belong to the site program and the applicable equipment instructions, not to a generic internet chart.
If the result fails, stop before entering the EPA. Refit the ribbon and heel cup, confirm the correct footwear and device are being used, check for obvious dirt or damage, and retest. If it still fails, quarantine or replace the grounder and notify the responsible coordinator. Never bypass a failed test by wetting the skin, changing tester settings, or touching grounded metal.

Walk and work without defeating the path
A heel strap depends on repeated floor contact. Normal heel-to-toe walking provides more consistent contact than walking on the toes, pushing a wheeled chair with both feet raised, or standing on insulating mats. Seated tasks may require a wrist strap or another approved method because the footwear path can be intermittent.
Keep the device inside its approved area. Outdoor grit, oils, water and uncontrolled cleaning products can contaminate the contact surfaces. Observe local rules at stairs, ladders and machinery: any device that affects traction, catches, or becomes loose must be removed from service safely. ESD control never overrides general workplace safety.
Clean, inspect and replace using written criteria
Inspect the ribbon, fastener, heel cup, conductive contact, seams and identification before use. Look for stretching, tears, embedded debris, worn contact material, loss of elasticity and parts that will not remain positioned. Clean only with a method compatible with the product and site; household polishes or residue-forming cleaners can change the contact path.
Set replacement criteria from inspection, test history and manufacturer guidance instead of promising a universal lifespan. Repeated failures, physical damage, uncontrolled modification, lost traceability or inability to stay fitted are reasons to remove the item. Store clean grounders so the ribbon and contact surface are protected.
Praktische Steuerungstabelle
| Kontrollpunkt | Correct action | Stop condition |
|---|---|---|
| Shoe and floor | Use the approved combination | Unapproved or visibly contaminated surface |
| Contact ribbon | Position as instructed against the wearer | Folded, cut, missing or misplaced ribbon |
| Heel cup | Keep centered and secure | Loose, rotated or damaged cup |
| Entry test | Test each required foot or pair | Fail or unclear result |
| Daily use | Maintain floor contact and follow EPA rules | Loose device or loss of safe traction |
Erstellen Sie einen kontrollierten Ablauf und ein Freigabemuster
Konvertieren Sie die Lieferantenanweisungen und diesen Planungsrahmen in ein kurzes Vor-Ort-Verfahren mit einem Verantwortlichen, zugelassenen Materialien, einer Abfolge, Bestanden-Kriterien, Stoppbedingungen und Aufzeichnungen. Verwenden Sie ein identifiziertes Freigabemuster oder einen Fotosatz, damit die Bediener die erwartete Konfiguration kennen. Trainieren Sie mit der realen Route und Ausrüstung und beobachten Sie dann mehrere normale Zyklen. Das Verfahren sollte festlegen, was ein Bediener sofort korrigieren darf und was Quarantäne und Überprüfung erfordert.
Trennen Sie Sicherheit, Sauberkeit, mechanische Funktion und ESD-Prüfung. Eine einzige Sichtprüfung kann nicht jedes Risiko abdecken, und ein einzelner elektrischer Messwert kann weder Sauberkeit noch mechanische Integrität belegen. Wenn eine Messung erforderlich ist, bestimmen Sie das Messgerät, die Methode, die Messorte, die Umgebung und die Akzeptanzgrenzen. Halten Sie die Gerätewartung (Gerätekalibrierung) und die Personalschulung im Rahmen des Werkssystems aktuell.
Wareneingangsprüfung und Change-Control
Beim Wareneingang Artikel, Menge, Revisionsstand, Lieferantencharge und Verpackungsetikett mit der Bestellung abgleichen. Auf Beschädigung, Verunreinigung, fehlende Kennzeichnung sowie unerwartete Abweichungen in Farbe, Beschaffenheit, Geometrie, Geruch, Hardware oder Verpackung prüfen. Abmessungen und funktionale Merkmale gemäß dem vereinbarten Plan prüfen. Unerklärliche Abweichungen unter Quarantäne stellen, anstatt zuzulassen, dass Produktionsdruck eine Ausnahme in eine undokumentierte Freigabe verwandelt.
Benachrichtigung vor Änderungen an Materialquelle, Additiv, Klebstoff, Werkzeugen, Abmessungen, Reinigungsmittel, Konstruktion oder kritischen Hardwarekomponenten erforderlich. Die Requalifizierung sollte sich auf die durch die Änderung betroffenen Funktionen konzentrieren, aber dennoch Wechselwirkungen überprüfen. Ein stärkerer Klebstoff kann die Entfernbarkeit beeinträchtigen; eine neue Lenkrolle kann das Spurverhalten und die elektrischen Pfade beeinträchtigen; ein neues Reinigungsmittel kann Etiketten und das Oberflächenverhalten beeinträchtigen.
Qualifikationswettkampf und Rekorde
Führen Sie den Versuch unter repräsentativen Umgebungs- und Betriebsbedingungen durch. Zeichnen Sie Datum, Ort, Bediener, Proben, Chargennummern, Ausrüstung, Reinigungsvorbereitung, Route, Beobachtungen und Abweichungen auf. Schließen Sie nach Möglichkeit einen aktuell zugelassenen Artikel als Ausgangswert ein. Verstecken Sie einen schwerwiegenden Fehler nicht in einer Durchschnittspunktzahl. Sicherheit, Produktschutz, Kontamination, Handhabbarkeit, Dokumentation und ESD-Anforderungen erfordern eigene Bestimmungsentscheidungen.
Überprüfen Sie die Ergebnisse nach ausreichend Zyklen, um die normale Streuung aufzuzeigen. Eine einzelne erfolgreiche Demonstration kann Bedienerunterschiede, Verkehrsspitzen, Verschleiß, Belastungs- und Reinigungseffekte übersehen. Der Bericht sollte Einschränkungen darlegen: was nicht getestet wurde, welche Aussagen Lieferantenerklärungen bleiben und welche Schlussfolgerungen nur für die getestete Konfiguration gelten. Bewahren Sie die Nachweise beim Artikel- oder Prozessdatensatz auf, damit zukünftige Teams die Grundlage der Genehmigung nachvollziehen können.
Überprüfen Sie den Prozess nach der Veröffentlichung
Beobachten Sie den Prozess während der normalen Arbeit nach der Freigabe, nicht nur während einer geplanten Demonstration. Bestätigen Sie, dass die Anwender die genehmigte Abfolge einhalten, Materialien verfügbar bleiben, Etiketten lesbar sind und die Stoppbedingungen verstanden werden. Überprüfen Sie Stichproben von Aufzeichnungen auf fehlende Ergebnisse, wiederholte Fehler und unerklärliche Ersetzungen. Fragen Sie die Bediener, wo das Verfahren schwierig ist, da Workarounds oft ein Passform-, Zugangs-, Verkehrs- oder Schulungsproblem offenbaren, bevor es zu einem Produktfehler wird.
Trendausfälle nach Artikel, Standort, Schicht und Lieferantencharge analysieren, sofern die verfügbaren Datensätze diese Analyse unterstützen. Wiederkehrende Probleme sollten eine Ursachenprüfung auslösen und nicht einfach zu häufigerem Austausch führen. Die Verfahrensanweisung aktualisieren, wenn sich Produkt, Werkhalle, Ausrüstung, Reinigungsmittel, Transportweg, Verpackung oder Kontrollplan ändern. Das Überarbeitungsdatum sichtbar halten und veraltete Kopien einziehen, damit die genehmigte Methode eindeutig bleibt.
Anfrage-Checkliste für Einkäufer
Geben Sie die folgenden Informationen an: Anwendung, Umgebung, Abmessungen, Schnittstellen, Konstruktion, erforderliche Funktion, Prüfverfahren, Annahmekriterien, Sauberkeit, Verpackung, Kennzeichnung, Rückverfolgbarkeit, Muster Menge, Dokumentation und Änderungsmitteilung. Überprüfen Sie die SWESD ESD footwear range und der SWESD Produktzentrum als Ausgangspunkte; die endgültige Freigabe muss mit dem gelieferten Artikel und dem eigenen Kontrollprogramm des Käufers übereinstimmen.
- Beschreiben Sie den tatsächlichen Nutzungsweg und das geschützte Produkt.
- Identifizieren Sie Ausschlusskriterien und akzeptable Nachweise.
- Fordern Sie Zeichnungen, Materialien und rückverfolgbare Prüfergebnisse an, sofern relevant.
- Definieren Sie Muster- und Erstmusterstückzahlen vor der Produktion.
- Liste der genehmigten Annahmen für Reinigung, Inspektion und Austausch.
- Verlangen Sie eine schriftliche Offenlegung von Ausnahmen und Änderungen.
Verwandte SWESD-Ressourcen
- using a wrist strap and footwear tester
- understanding ESD footwear
- coordinating clothing and footwear controls
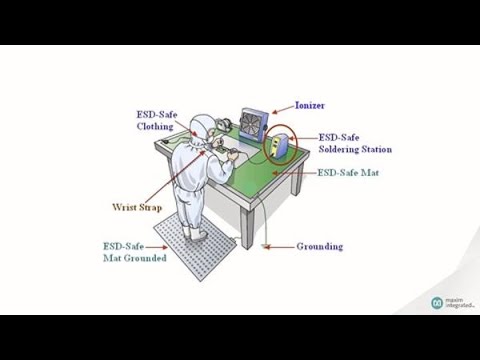
Educational video: Fundamentals of Electrostatic Discharge
This neutral educational video from Maxim Integrated provides background for the controlled process. The written guide remains complete without it.
Häufig gestellte Fragen
Should heel straps be worn on both feet?
Follow the facility control plan and product instructions. Many programs require two grounders for more continuous contact, but the approved system and test define the rule.
Can a heel strap work on any floor?
No. It must be used with a compatible, qualified flooring system and verified as the complete person-footwear-floor path.
What should I do after a failed test?
Stop before entering the EPA, refit and inspect the device, retest, and quarantine or replace it if the failure remains.
Can heel straps replace wrist straps at a seated bench?
Only if the documented ESD program has approved that method for the task. Foot contact may be intermittent while seated.
Maßgebliche Referenzen
Neuester Beitrag
-
 ESD-Box-Verformungsprüfung: Passgenauigkeit vor dem Auspacken messen22. Oktober 2026
-
-
Schreiben Sie eine Antwort