- Turbo
- Blog
ESD floor tape identifies a controlled boundary, aisle, workstation zone, or handling instruction in an electrostatic protected area. It is primarily a communication and floor-marking product; it does not by itself ground personnel, dissipate charge, or make an uncontrolled floor into an ESD control system. A successful installation connects the tape wording and color to the site’s documented rules, uses an adhesive compatible with the floor and cleaning process, remains visible under traffic, and avoids loose edges that create a safety hazard. This guide helps ESD coordinators, facility teams, and buyers specify, trial, install, inspect, and replace floor tape without confusing a visual boundary with electrical protection.
Define the message before selecting the tape
State what the line means: entry into an EPA, an aisle boundary, a keep-clear zone, a cart location, or a transition where personnel checks are required. The exact wording should match the facility control plan, signs, training, and audit language. A decorative stripe with no agreed behavior does not create control.
Limit the number of colors and messages so workers can recognize them consistently. OSHA’s archived interpretation notes that aisle lines may use different colors as long as they clearly define the aisle; local codes and current site safety requirements still govern the installation. Do not present a company color convention as a universal legal rule.

Do not confuse marking with electrical performance
Some products are marketed as antistatic or ESD tape, while others are ordinary durable floor-marking tape printed with an ESD warning. Ask which function is claimed and what evidence supports it. Regardless of material, the visible line alone does not provide the grounding, footwear, flooring, work-surface, ionization, packaging, or personnel controls required by the ESD plan.
If the tape crosses or covers a functional ESD floor, assess whether its insulating area, adhesive residue, wear, or layout affects the approved system. The ESD coordinator and facilities owner should approve the detail. Do not extrapolate a surface claim from a small tape sample to the behavior of the entire floor-personnel system.
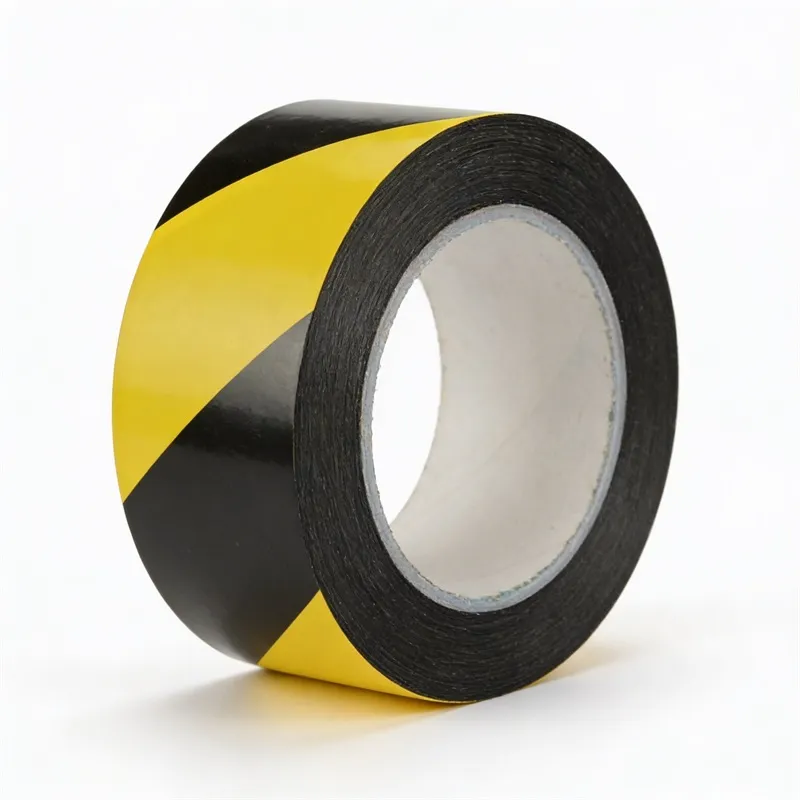
Match backing and adhesive to the floor
Document floor material, coating, texture, porosity, age, condition, cleaning chemistry, temperature, moisture exposure, and traffic. Adhesive that performs on smooth sealed concrete may behave differently on textured tile, epoxy, worn coatings, or contaminated surfaces.
Use a representative installation trial. Check initial placement, edge lift, removal, residue, print wear, cleaning compatibility, turning wheels, foot traffic, and the effect of normal environmental conditions. Do not rely only on a short hand-peel test or assume that the strongest adhesive is the safest choice.

Plan the layout around work and traffic
Create a scaled layout showing boundaries, doorways, benches, exits, fire equipment, material flow, forklift routes, and floor joints. Keep markings understandable at approach distance and avoid patterns that conflict with existing safety or logistics lines. Use signs or entry instructions where a line alone cannot communicate the required action.
At corners and transitions, avoid small loose pieces and abrupt geometry that receives concentrated wheel force. Do not cover damaged flooring or use tape as a substitute for repair. OSHA requires walking-working surfaces to be maintained in a clean and orderly condition; raised edges, wrinkles, and debris should be corrected promptly.
Inspect and replace before the boundary becomes ambiguous
Set routine checks for adhesion, edge lift, wrinkles, tears, dirt, print legibility, missing sections, adhesive residue, and conflict with changed layouts. Define who can repair the line and how temporary gaps are controlled. Random patching with a different color or wording can weaken the visual system.
Replacement timing should follow observed condition and risk rather than a universal service-life claim. Record recurring failure locations. Turning wheels, floor joints, harsh cleaning, oil, moisture, or poor preparation may require a different construction or layout—not simply more frequent replacement.
Tabela doboru i kwalifikacji
| Planning item | Decision to document | Acceptance check |
|---|---|---|
| Boundary meaning | EPA entry, aisle, keep-clear or equipment zone | Matches procedure and signage |
| Floor condition | Material, coating, texture and contamination | Representative adhesion trial |
| Traffic | People, carts, pallet jacks or forklifts | Wear and edge-lift observation |
| Tape construction | Backing, adhesive, width, print and color | Approved sample and label |
| Maintenance | Cleaning method and inspection owner | No loose edges or unreadable message |
| Kontrola zmiany | Who can move or repair markings | Updated layout and training |
Przeprowadź kontrolowaną próbę pierwszego wyrobu
Użyj udokumentowanej próbki reprezentującej proponowaną konstrukcję produkcyjną. Porównaj ją z aktualnie zatwierdzonym elementem, jeśli taki istnieje. Zarejestruj identyfikację, rewizję, partię dostawcy, warunki środowiskowe, sprzęt, operatorów oraz spostrzeżenia. Próba powinna obejmować przyjmowanie, magazynowanie, przygotowanie, normalne użytkowanie, czyszczenie (jeśli dotyczy) oraz utylizację lub zwrot. Przerwij próbę, jeśli element uszkodzi produkt, spowoduje zanieczyszczenie, będzie zakłócał pracę sprzętu lub będzie w sprzeczności z procedurą ESD lub procedurą bezpieczeństwa.
Oddziel kryteria zaliczenia od obserwacji. Wymiary, etykietowanie, dopasowanie, jakość wykonania, dowody materiałowe i zachowanie funkcjonalne mogą wymagać różnych kontroli. Rozwiąż odstępstwa przed zatwierdzeniem wielkości produkcyjnych oraz zachowaj kontrolowany rysunek, raport i próbkę zatwierdzenia. Wymagaj powiadomienia dostawcy przed zmianą źródła materiału, dodatku, kleju, konstrukcji, narzędzi, procesu lub krytycznego wymiaru.
Kontrola wejściowa i bieżąca
- Dopasuj pozycję, rewizję rysunku, ilość, numer partii dostawcy oraz etykietę opakowania do zamówienia.
- Sprawdź pod kątem zanieczyszczeń, uszkodzeń, wad wykonania, nieprawidłowych wymiarów oraz braku identyfikacji.
- Przeprowadź uzgodnione pobieranie próbek i weryfikację przy użyciu udokumentowanej metody oraz skalibrowanego sprzętu, tam gdzie wymagany jest pomiar.
- Poddać kwarantannie niewyjaśnione zmiany koloru, zapachu, struktury, lepkości, dopasowania, nawinięcia, geometrii lub wydajności.
- Prowadź ewidencję odbiorów i powiązuj reklamacje lub awarie z wadliwą partią.
- Przejrzyj specyfikację w przypadku zmiany produktu, sprzętu, trasy, metody czyszczenia lub planu kontroli.
Lista kontrolna zapytania ofertowego (RFQ) dla kupujących
Określ zastosowanie, granicę zabezpieczenia, interfejs urządzenia lub części, wymiary i tolerancje, konstrukcję materiałową, wymaganą funkcję, metodę badań i kryteria akceptacji, wymagania dotyczące czystości i jakości wykonania, pakowanie, etykietowanie, identyfikowalność, wielkość próby, oczekiwania dotyczące pierwszego artykułu, dokumentację, powiadamianie o zmianach oraz wielkość dostawy. Odnieś się do SWESD ESD floor marking tape product dla aktualnie wyświetlanego typu produktu i użyj Centrum produktów SWESD aby skoordynować to z powiązanym sprzętem przeładunkowym.
Poproś dostawcę o wymienienie założeń i wyłączeń. Unikaj kopiowania niezweryfikowanych twierdzeń z katalogu do kontrolowanej specyfikacji. Limity techniczne, certyfikaty i oświadczenia o zgodności powinny zostać zweryfikowane pod kątem faktycznie dostarczonego przedmiotu oraz zastosowania po stronie kupującego.
Porównaj próby w tych samych warunkach
Przydatne porównanie zmienia tylko jedną decyzję naraz. Dla każdego kandydata należy użyć tych samych reprezentatywnych części, operatorów, sprzętu, trasy, przygotowania do czyszczenia oraz okresu obserwacji. Próbki należy oznakować, aby osoby przeprowadzające przegląd nie pomyliły tożsamości dostawcy, rewizji ani kolejności testów. Tam, gdzie jest to praktyczne, należy uwzględnić obecnie zatwierdzony element jako punkt odniesienia. Należy rejestrować zarówno poprawne zachowanie, jak i pracę niezbędną do jego osiągnięcia, taką jak dodatkowa regulacja, wielokrotne czyszczenie, wolniejsza obsługa lub interwencja operatora.
Nie łącz wniosków dotyczących instalacji elektrycznych, mechanicznych, czystości oraz handlowych w jedną ogólną ocenę. Kandydat może pasować, ale nie mieć sprawdzalnych dowodów materialnych lub posiadać mocną dokumentację, ale słabo wypadać przy maszynie. Zachowaj odrębne kryteria zaliczenia dla bezpieczeństwa, kontroli ESD, ochrony produktu, kompatybilności sprzętowej, zanieczyszczeń, użyteczności, dokumentacji oraz kosztów cyklu życia. Każda poważna usterka powinna zostać rozwiązana, a nie ukryta za wysoką średnią oceną.
Porównanie handlowe powinno uwzględniać koszt zakończonego i zaakceptowanego procesu, a nie tylko cenę za sztukę. Należy uwzględnić nakład pracy na inspekcję, czas przełączania, odpady, czyszczenie, wymianę, ryzyko przestojów, logistykę zwrotów, dokumentację oraz wpływ niespójnych partii. Czynniki te nie uzasadniają wymyślania deklaracji dotyczącej żywotności; pomagają kupującemu zaprojektować próbę, która mierzy warunki rzeczywiście generujące koszty.
Powiązane zasoby planowania SWESD
- reviewing ESD-safe tapes used in SMT areas
- planning grounded ESD workstation surfaces
- using precise ESD procurement language
Educational video: Fundamentals of Electrostatic Discharge by Maxim Integrated
This educational video explains the hazard controlled inside an EPA and reinforces why a marked line is only one part of the control system. The written guide remains complete without the video.
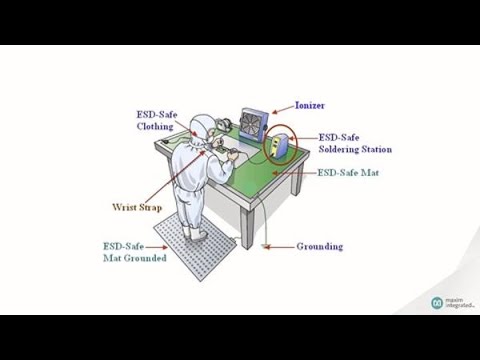
Open this video from Maxim Integrated on YouTube.
Często zadawane pytania
Does ESD floor tape ground people or equipment?
No. Floor tape normally identifies a boundary or instruction. Grounding and charge control require the separately approved systems in the facility ESD plan.
Must all ESD floor tape be yellow?
No universal color rule should be assumed. Use a documented site convention that remains clear and does not conflict with applicable safety requirements.
How should adhesion be approved?
Install a representative trial on the actual cleaned floor and observe edge lift, residue, cleaning, traffic, print wear, and removal.
When should floor tape be replaced?
Replace it when adhesion, damage, contamination, missing sections, or poor legibility makes the boundary unclear or creates a walking-surface risk.


Napisz odpowiedź